
Sunday, November 22, 2015
EASY HALF-UP TWIST HAIRSTYLE TUTORIAL

I was playing around with some styles after filming a braid tutorial when I came up with this simple do. It’s perfect for when your hair looks pretty good out but you want to pull it back off your face.
Hands up if you have the habit of tucking your hair behind your ear all day long. Yep, that’s me with both hands up. I love wearing my hair out but get frustrated with hair in my eyes.
If you’re like me then you have to try this style.
I think it’s so easy and would be gorgeous festival hair with a flower crown. It would be gorgeous for a boho bride too.
Me? I’m just going to wear this on a lazy day when I want to wear my hair out without constantly tucking it back behind my ear.
What you need:
- Small clear hair elastic
- Bobby pins (optional)
Step-by-step hair tutorial:
Separate out a section of hair on either side of your face.
Then pick up a small piece of hair between the front section and the rest of your hair.
Join these small pieces of hair together at the back of your head with a small clear hair elastic. You can alsotopsy-tail this section to make sure is firmly in place.
Next take part of the front section you left out and start wrapping it around the hair at the back of your head. Keep wrapping until all your hair is included in the half-up twist.
If you want to give this style extra hold, you can use bobby pins to hold the twist in place. Alternatively you can use hairspray too.
STYLING TIPS
- What if your hair keeps falling out of the twist? If your hair keeps falling out, it’s probably too clean. You can use a little dry shampoo to add some grip to your hair. Alternatively you could use hairspray on the sections before you start to wrap them around.
- What if your hair is curly? Then this style is going to look gorgeous! Curly or wavy hair is perfect for this type of updo, and your hair will hold really well. You probably won’t need any bobby pins at all.
- What if you don’t have a small elastic? You should really go an get some. They are the best but if you have a big elastic, try and choose one to match your hair colour so it’s more easily hidden in the finished look. source

Friday, October 30, 2015
11 Reasons to Celebrate Your Big, Awesome Thighs

It's pretty clear that butts are all the rage. And while we're making it like all the booty hype is brand new, women's shapely bums have always had sex appeal, while other parts of our body have gotten the shaft. Like, thighs. Especially curvaceous, substantial, thick thighs. Unlike a big butt, where's the pride in having big thighs?
Well, believe it or not, ladies born with thick thighs needn't hang their heads in shame over "chub rub" or struggling to squeeze into skinny shorts every summer. As it turns out, those fuller legs are actually something to celebrate. Here, 11 surprising benefits of big thighs.
1. You look more polished in the summer. While women with slimmer thighs may be spending the hotter weather months in teeny shorts, you're drawn to supremely more stylish A-line sundresses or cool, linen pants. Fashion win.
2. Your fitspiration role models are the sexiest, most powerful around. Think Shakira, Beyonce, JLo, Serena Williams, Khloe Kardashian. Not waifish runway models.
3. You can have rocking lower body strength. The muscles in your legs are the biggest in the body, which means they could be (at least partially) to thank for those "thunder" thighs. (Let's take that nasty playground insult as a compliment now, eh?) Even if they're not, working on tightening and toning them will pay off. The more muscle on your body, the higher your metabolism, and the more fat you'll burn. Plus, who wouldn't want to be more adept at squatting, lifting, running, dancing, etc.? All perks of strong hammies and quads!
4. Speaking of squats ... A lot of women actually wish they had curvier legs, and thus do specific work at the gym to get what you've already got!
5. You may be at less risk for heart disease. Okay, so research shows the fat that accumulates in the thighs and booty is harder to shift than fat around your stomach, but it's actually better than having a pot belly, according to researchers from Oxford University. Fat around the waist (think apple shape) is thought to be more dangerous and raise risk of heart disease and diabetes.
6. ... and have healthier bloodwork to prove it! The same study found women with bigger thighs have lower levels of cholesterol and are more likely to produce hormones to metabolize sugar.
7. You were an early adopter of Spanx. Everyone and their mama may wear shapewear these days, but you probably jumped on the bandwagon way back, realizing that they'll not only smooth lumps and bumps but prevent chafing, too.Smartypants!
8. You own the vintage "wiggle" dress look. From Marilyn Monroe to Joan Holloway on Mad Men, women have been wearing curve-hugging dresses for decades, and the sexy style simply wouldn't work sans fuller thighs.
9. You can't help but have a more unique style. Whether you're tall, petite, or somewhere inbetween, having big thighs means having to go to throw in the towel on wearing a lot of the same cookie cutter clothes in major retail stores or having your tailor stored in your favorite contacts list! Either way, you're not going to look like everyone else -- which is something to cheer about.
10. You'll have less pain later in life. Researchers at the University of Iowa found that stronger thigh muscles can help protect women (not men!) from the pain of arthritic knees later in life. Hurrah!
11. And less risk of injury. No matter how "big" they are or how they rub together (thigh gap, be damned!), fit inner thighs mean a stronger core, which keeps your spine happy and wards off back injury!
12. You're in kick-ass company. What do snowboarders, surfers, climbers, long-distance runners all have in common? Bigger, muscular thighs, obvi. And they need them to cross those finish lines and take home medals. Now, how's that for something to be proud of? source
10 Workout Moves to Make Your Breasts Perkier

From doing tons of squats to pushups galore, we know working out can transform our shapes in mind-bogglingly awesome ways. But there are certain "figure fixers" we're more skeptical about than others. Like those exercises we've been told for eons are supposed to perk up our breasts. Is it really possible?
Well, believe it or not, it is! Experts say that targeted exercises and strengthening the right muscles (the pectoralis major and minor) canenhance your "girls." Here, 10 smart moves to try for perkier breasts andperfected posture ... (Shoot for 8-12 reps and up to 4 sets per move.)
1. Sag stoppers: Start in a lunge with a band looped under back foot. Hold an end in each hand by shoulders, arms bent and parallel to floor, elbows behind you. Press arms straight out to front, level with shoulders. Slowly and with control, bring arms back to start so you feel chest stretch open. Switch legs and repeat.
2. Medicine ball pushups: Come into a pushup position with left hand on top of a medicine ball, right hand on the floor. Engage legs and draw belly button up and in. Keeping the body in a straight line, bend elbows and slowly lower down as far as possible. Press up through both hands to return to starting position. Complete the prescribed number of reps on one side and then place the opposite hand on the ball and repeat.
3. X-Raises: Stand with feet hip-width apart, the end of a band under each foot. Hold the other end in the opposite hand so bands crisscross in front of you, hands at sides. Bend knees and squat, extending arms out slightly to sides. As you straighten legs to stand, simultaneously reach up and out. Return to squat for one rep.
4. Chest Pass: Lie faceup on the floor with knees bent and feet flat, holding a medicine ball at chest. Keeping lower back pressed into the floor and abs engaged, throw the ball up in front of you as high as possible. Catch with straight arms and immediately lower back to your chest and repeat. Continue as quickly as possible until all reps are complete.
5. Kickbacks: Stand on a resistance band, feet hip-width apart, holding an end in each hand. With arms down at sides, squat and bend slightly at waist, keeping back flat. Draw the band behind you, keeping arms straight, squeezing shoulder blades together and feeling chest stretch open. Slowly release arms for one rep.
6. Shoulder Presses: Stand with your feet shoulder-width apart and knees a little bent. Hold the dumbbells a little above your shoulders and press them up until your arms are straight over your head. Hold for a second and lower the weights to where you started. And repeat.
7. Pullovers: Rest your upper back, shoulders and neck in a resting position on a bench, and both feet flat on the floor. Your knees at this point should be bent at 90 degrees. Now hold the dumbbells over your breasts, hands outstretched. Then lower them as much as you can below your head level. Repeat it by lifting the dumbbells back up above your chest.
8. Pectoral flys: Grasping two dumbbells, lie on your back on the floor or bench. Bring your arms straight to your sides. Lift dumbbells above your chest, internally rotating shoulders, with elbows pointing out to sides. Lower dumbbells to your sides until you feel chest muscles are stretched with elbows in a slightly bent position and repeat.
9. Push-ups: Lie facing the floor with your hands slightly wider than your shoulders. Keeping your core tight and your body straight, raise your body slightly off the floor by extending your arms. Lower your body to the floor by bending arms and repeat.
10. Planks: While in a push-up position on the floor, rest your weight on your forearms, bending them at 90 degrees beneath your shoulders. Make sure to keep your core in tight and spine in a straight line. Hold for 30 seconds to one minute. source
11 Proven Ways To Increase Metabolism

Every time we eat or drink, we can thank our metabolism for converting all those calories into energy. Our size, gender, and age all factor into our metabolic rate, but there are also ways to independently control its speed. And the faster our metabolism, the more calories we burn off, making that Krispy Kreme breakfast no longer such a big deal. Here are 11 ways to keep that body burning:
1. Sleep!
Almost nodding off in line at Starbucks isn’t the only downside of not catching enough zzz’s. Researchers have found a link between metabolism and sleep, and not getting enough of it may seriously slow metabolism.
2. Drink green tea.
Not only does this superfood pack an antioxidant-punch, researchers have found it speeds metabolism as well. Plus, it’s naturally calorie-free, so there’s no reason not to enjoy a mug (or two).
3. Amp up workout intensity.
Slow and steady may not always win the race. High Intensity Interval Training (HIIT), such as interval runs, are quick intense exercises that can jumpstart metabolism and keep us burning calories long after the workout is over. (Afterburn effect, anyone?)
4. Don’t skip breakfast.
It may be time to reconsider hitting snooze in favor of getting up to grab a quick bite before starting the day. Studies show the importance of quick-starting metabolism with breakfast. No AM appetite? Snack on something small, like a bowl of Greek yogurt.
5. Pump some iron.
The weight room isn’t only to help bulk up or get lean. Lifting weights can also help speed resting metabolic rate, making those dumbbells our new best friends.
6. Gulp some H20.
Forget converting it to wine—drinking enough water is a simple way to speed up digestion and burn calories. We may need more than those recommended eight glasses a day, too. Now if only wine could speed metabolism, too…
7. Spice things up.
The next time a chicken breast is cooking up in the kitchen, add a dash of cayenne pepper. The heat from the pepper is thanks to capsaicin, which won’t only add a fiery kick—it could help boost metabolism, too.
8. Squeeze in some cardio.
Hop on the bike and clock in some miles— one study found that 45 minutes on the bike sped up metabolic rate for over 12 hours. Guess learning to ride a bike way back when was worth it!
9. Eat wisely.
Who knew eating could actually help speed calorie burn? Certain foods like tuna and grapefruit have been shown to speed up metabolic rate. Packing in protein has also shown to boost metabolism, so pick some eggs over pancakes at the breakfast table for a morning metabolism boost.
10. Grab a cup coffee.
This caffeinated morning beverage is not only a savior when it comes to pushing through a midterm paper or work meeting. A cup of coffee (or the caffeine in it) is absorbed into the blood stream very quickly, speeding up heart rate and provide a metabolic boost that peaks at about three hours after drinking.
11. Laugh a lot!
A little laughter may go a long way. Scientists have found that as little as 10 minutes of laughter per day (or roughly half an episode of SNL) can burn energy. Just another reason to stay smiling! Source
Retro Waves and a Compliment Giveaway

There's always a place to wear your hair like this, and it'll work with any length of hair just about! unless you have a pixie cut.haha Also a big part of keeping the curls in all day is letting them set, and it's something that I do often with my hair to keep a curl, but if you have hair to or above your shoulder-blades
and now onto the fun part!
I've been a huge fan of Melissa and her work at Shop Compliment for ages now, and I'm very excited to share her shop with you guys in a giveaway for $50 credit! I have a bunch of pieces from her at this point that I love and wear often, and this pair from the Kimberly Collection I knew were just right to feature in a wedding tutorial! With a different compliment in every box, I think these would be the perfect gift for bridesmaids, friends, sisters, or to yourself!:)
a Rafflecopter giveaway
Well I hope you completed all the entries you could, and I hope you love this style! It's a favorite of mine (and martin's) for sure, and I hope that you give it a try as well and then come back to tell me how it went:)
I love the bohemian unkempt hair trends this year, but it'd refreshing to do something sleek and classy once in a while don't you think? Anyway's be sure and leave any thoughts or question you may have down in the comments section, and I hope you have a great day! Thanks for stoppin' by,
Fur Boots

I hope everyone had an amazing Christmas with your friends and families! We had LOTS of celebrations and had such much fun with family that got to come into town. We ventured off to Big Cedar last weekend for a little before Christmas getaway. We have done this a few times before Christmas and have enjoyed it every single time.
I wore this outfit to dinner one night while we were there. I love this plaid pencil skirt. Most pencil skirts fit me odd, but this one is cotton so it fit perfectly. I paired it with a cropped sweater and these adorable fur cuffed Marc Fisher boots. I love the pointed toe on them and how they make my look a bit more special. One thing I have learned about Marc Fisher shoes this year is that they are extremely comfortable too...
I wore this outfit to dinner one night while we were there. I love this plaid pencil skirt. Most pencil skirts fit me odd, but this one is cotton so it fit perfectly. I paired it with a cropped sweater and these adorable fur cuffed Marc Fisher boots. I love the pointed toe on them and how they make my look a bit more special. One thing I have learned about Marc Fisher shoes this year is that they are extremely comfortable too...
Winter in Black
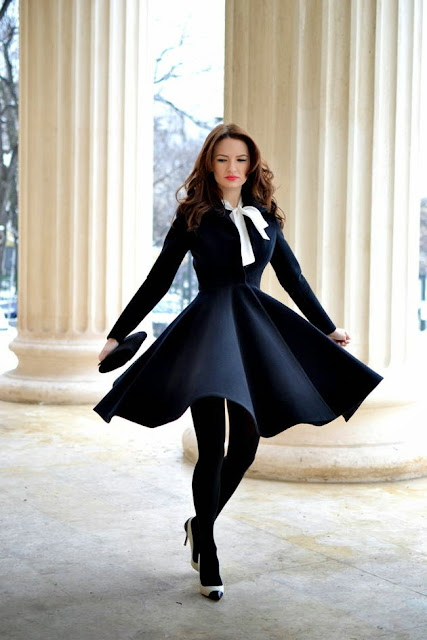
Hi, sweeties!
I must confess I’m going through a beautiful period of my life, right now.
It takes a lot of work, a lot of lost hours of sleep...and a few kilograms less,
but the fulfillment and satisfaction I feel makes it all worth it!
I can’t believe this is the first time I’m wearing my „perfect coatˮ this year.
I love it so much, but I’m somehow terrified of wearing it when I have a lot of errands
to run. Why is that? I have the impression that I’m tearing everything down when
I move around. I am like the elephant in the china shop!
Of course I had to wear it with the black version of my full skirt, and my new shoe crush.
I just can’t wait to wear these babies with boyfriend jeans!
Spring is on its way, right? As always, you can find the skirt here.
And...thank you for everything! With all my heart!
Kisses
Well red

I recently received an email from a reader requesting for me to feature more casual outfits. Ironically, I feel like I've shown almost too many sweater + denim looks lately and was afraid I'd been alienating those of you who work in an office & have to dress up each day. I always want this blog to be a careful balance of things I actually wear in real life & more polished office-ready ideas that help you utilize what you have in your closet. But reader feedback is the ultimate gauge for me & I definitely want to tailor the content here on PPF so it's appealing to the masses. That being said, I'd like to hear from all of you in the comments below - would you like to see more work appropriate ensembles or is it more helpful if I feature off-duty weekend looks like this one? (P.S. This outfit would be even cuter with sneakers - I just couldn't bear the cold ankles!)
Holiday Outfit

The holiday season is finally in full swing, which means lots of shopping, gift wrapping, baking cookies & running errands around town. If you're like me, you want to be comfortable but still look stylish while getting those to-do items checked off your list. And nothing beats a fun & festive knit this time of year! I bought an ivory fair-isle sweater from Old Navy last December and nearly wore it out...so I was thrilled to see that they brought them back again & gave them a modern twist. Today I'm sharing two ways to wear these cozy sweaters while you're out & about this winter. I focused on casual pieces that you can wear any day of the week, but they would also be easy to dress up with tailored trousers (for work) or a sequin skirt (for parties).

You can never image how much a stunning and fabulous hairstyle can bring to you. A best hairstyle can enhance your charm and grace, while a bad one may make you have bad mood the whole day. It is suggested to evaluate different views since different hairstyles are suitable for different face faces and occasions. There are many a hairstyles for long hair. You can just lave your long hair loose, and you can also create it into ponytail, braids and bun updo hairstyles. You can apply some hair products such as a gel or mousse to keep your hair shining and keep it in style longer.
You can accessorize your hair with attractive jeweled accessories or hair bands which match your dress. If you want to know the basic steps, you can keep on reading the following text from which you can learn and choose the popular hairstyles.
This is a fashionable and interesting twisted hairstyle which offers people a causal and care-free effect. Smooth your hair. Section out the front and side hair. Fix it with a bobby pins. Style the bottom section hair into a bun. Twist the side hair into the bun and use chip pins to fix the hair ends.
Source
Everyday Chic Neutral Makeup Tutorials

Step by Step :
1. Start the make applying the Light Up the Contains 1g below the eyebrow, then esfumó with the index finger it. This step I do ALWAYS, regardless of makeup. This facilitates the smoky concave and leaves look bigger and more beautiful.
2. Then apply a primer across eyelid (I used the Make B) and then an opaque brown shade a couple, three tones above the natural color of my skin. Apply it to the dobrinha eye rising slightly above the concave.
3. I take this brown to the outer corner of light, so do not give to see where it ends and where the color begins to "skin". Thus the outer corner is not with any "marking", but very natural.* This step makes life much easier, because for me the hardest of makeup and make that defined zone.
4. Step the same brown close to the lower lashes, linking upper eye with less.
5. To give a smooth setting around the eyes, blending a brown gray shadow on the outer corner (in lying V) and concave, very lightly, leaving that cintilância "inside" the light brown shade.
6. With a thin brush to apply Satin Taupe close to the lower lashes too.
7. To define the outline of the lashes apply black pencil only the middle of the eye to the outer corner, above and below. Then esfumó with the same brush I used to apply the Kid shadow, because as he is "Sujinho" with brown shade will soften the black.
8. Apply a cream shadow in the inner corner a little invading the upper and lower eyelid.
9. To give a boss in the eye apply a little illuminating shade in the middle of the eyelid.
Used Products :
I used the shadow Kid MAC and the E60 Sigma brush.I used the shadow Satin Taupe MAC and the Sigma E25 brush.I used the E05 from Sigma.I used the Zero pencil from Urban Decay.I used the MAC Vanilla shade and the Sigma E30 brush.Moonshadow Baked Palette Sephora
source
Fabulous French Twist Updos

As we all know, the French women have their own way to look beautiful. Among all hairstyles, we love their simple and elegant updo hairstyle so much. Their lovely shape will make you look trendy and stylish in any occasion. This hairstyle will work best for those medium to long hair girls. If you don’t know how to make a cute French updo hairstyle, there’re plenty of French updo tutorials to show you how get that look in a few steps. It won’t take you too much time to create an elegant updo look in the morning. You can go to all kinds of mousse or gel for help to keep your hair in place and last longer. To make your updo hairstyle look more glamorous and luscious, you can also use some hair conditioners.
How to : Apply False Eyelashes

Step by Step :
Have you ever spent hours in front of the mirror trying to apply fake eyelashes, only to end up with them sticking out at strange angles, or—worse—fall off completely after a few hours? Because falsies are tricky to master, we tapped Los Angeles–based makeup artist Gia Brascia to show us her tried-and-true application (and removal) tips.
For the tutorial, we used Kevyn Aucoin The Lash Collection in Starlett.
1: Before you do anything else, measure the length of the lash to make sure it fits your eye shape. If the strip needs to be cut to fit, snip the outer edge completely off with small nail scissors. This will avoid drooping at the corner (meaning: no more lashes poking your eyeball).
2: Take both edges of the lash and bend inward to create a “C” shape, and hold for a couple of seconds. That’s the best way to take out the straightness and ensure it molds to our curved eye shape and stays put without the corners lifting up. Just this alone will make the rest of the process effortless.
3: Apply a high-quality glue such as DUO Eyelash Adhesive for lasting results (Brascia suggests avoiding the glue that comes with your lashes). If you have a steady hand, you can squeeze straight from the tube onto the strip. Tend to get shaky? An easy trick: put glue on the reverse (handle) end of a tweezer and glide it across the strip, as pictured. Be generous at both the inner and outer corners so the glue won’t unstick when you blink.
4: Wait ten seconds or so for the glue to become more tactile and sticky (you can also blow on the glue or wave it gently in the air) before placing the lash. This is the best way to keep the strip from slipping around while you’re trying to line it up properly.
5: Aim for the base of your natural lash line, right on top of your real lashes, not touching the eyelid at all. The glue dries clear, so don’t worry if a little gets on your skin.
6: Once you’ve placed both lashes, you can do your mascara; this will help integrate the natural lashes with the false ones.
7: If you see a gap showing on the eyelid between your real lashes and falsies, don’t worry! You don’t have to pull it off and start again, says Brascia. Just fill in the gap, using a matte black eye shadow as a liner to hide it (we used Inglot Cosmetics Freedom System Eyeshadow in 391). This step will also help the glue dry more quickly
Removal Tips: Always remove false lashes before taking off rest of your eye makeup. First pre-soften the glue with a cotton swab that’s been soaked in an oily makeup remover, like rms beauty Raw Coconut Cream. Dab the swab along the lash line to loosen the glue and break down its stickiness. With your eye open, take hold of the lash at tip of the outer corner. Then close your eyes and very slowly peel the strip away from your real lash, working from outer to inner corner—toward the nose.
source
Orange and Torquoise Makeup Tutorials

Step by Step :
1. Start applying the make a creamy orange shade on the mobile eyelid. You can change this shadow for a good primer / fixer, ok?
2. Following apply a shimmering orange shade on top....
3. Smudge on the concave outer corner and an opaque brown shade.
4. Esfume the same shadow close to the lower eyelashes, the brush down in inverted C connecting the upper part and the lower part of the eye.
5. Outline the entire eye and waterline with black pencil.
6. Now cover the entire pencil with opaque black shade and in March the outer corner leaving a black "in" brown.
7. With a cuddly esfume brush that black inside when he meets with the orange becomes a beautiful golden-green. Also esfumó black for him to "mix" with brown outside and concave corner.
8. Close to the lower lashes apply a turquoise shade and pulled it out for making a "Egyptian outlined" soft.
9. I conclude with pearl luster in the inner corner and false eyelashes.
Used Products :
yellow brushShadow Fierce & Tangy MaybellineOrange shade with golden glow of the 96 color palette of JasmyneO13 of Maria Margarida brushTrio Pause shadows to Feminices of TractaPencil Black Touch of NatureBrush 166 MAC.Brush 217 MAC.Sigma E20 brush.Shadow Poolside Makeup GeekBrush E47 SigmaGlitter Dance of Bless Cosmetics.Eyelashes 014 Eyelashes Beauty of Klass Vough.
source
Super Basic Black and Brown Neutral Makeup Tutorials

Step by Step :
1. Start applying the make a creamy shade of high durability throughout eyelid and outer corner. Apply and longer give a light mist without much overcome dobrinha eye (if your eye is small can overcome, if medium / big no, ok?).
2. Following esfume the crease and outer corner with an opaque light brown shade.
3. Eye contour with brown pencil reinforcing it at the outer corner!
4. With a brush pontudinho mark the concave, the outer corner and the region close to the lower lashes with a chocolate brown shade.
5. Esfumó all cuddly with brush!
6. Now apply opaque black shadow to dobrinha eye very lightly, at the outer corner and close to the lower lashes.
7. Beige shadow in the corner to light.
Used Products :
O13 of Maria Margarida brushShadow Soft Brown MACBrown pencil Touch of NatureBrush 012 Maria MargaridaShadow of Alice Salazar Salazar.Sigma E20 brush.Vult brush.
HOW TO CONTOUR AND HIGHLIGHT

Take these tips from Amy to add to your ever-growing arsenal of makeup techniques. We know how difficult it is to get straight information when you’re looking through hundreds of turorials on how to perfect a makeup skill (to use bronzer or not to use bronzer?!) but as always, Amy has made it easier than ever for you to learn how to use your natural bone structure and just a few key pieces of makeup to contour and highlight your best features. Use this basic makeup tip to kick your daily beauty routine up a notch!
Contour & Highlight:1.+ 2. Apply one layer of foundation or tinted moisturizer all over face. I used Tarte’s BB Cream in “Medium Light”. Using a foundation brush and a cream concealer (2 to 3 times lighter than your skin tone), apply concealer (the highlight) to the under eyes, down the sides of the nose, and brushed back and upward toward the hairline.
3. Using the same concealer, highlight the center of the forehead and down the bridge of the nose, upper lip, center of the chin and on your brow bone. Lastly, apply the concealer to the jawline, just under your cheekbones.
4. Once you’ve finished with all the highlighting, it’s time to apply the contour. Pick a cool-toned cream concealer or foundation thats 2 to 3 shades darker than your skin tone. Taking a smaller, stiff brush or foundation brush, apply the contour cream to the hallows of your cheeks, just below your cheekbone, all the way to your hairline.
5.+ 6. +7. Apply the same color to your forehead near your hairline, temples, jawline, the sides of your neck and to the sides of your nose.
8. Using a wet Beauty Blender or Duo Fiber Blending Brush, blend all the contour and highlighter together until there is no more distinction between the two colors.
9. Lastly, Apply a light dusting of blush, and set all the highlight with a loose powder using a small natural bristled brush. I used Tarte’s 12 Hour Amazonian Clay Blush in “Tipsy” and Make Up For Ever’s Super Matte Loose Powder in “Translucent Natural”.
Pro Tip: You can use cream or powders to contour or highlight, creams are easier to blend and tend to look more natural. Avoid using bronzer to contour. You are creating a “shadow” so think of a color that’s similar to an actual shadow, which tends to be a cooler tone. Use Bronzer to warm up your skin and make it look sun-kissed!
Favorite Products: Make Up For Ever’s Foundation Brush “30N” & Senna Cosmetic Face Sculpting Cream “1.
Source
Subscribe to:
Posts (Atom)